This guide describes how to configure OpenVPN GUI on Windows.
Please note that our VPN Client Software for Windows supports OpenVPN, L2TP/IPsec and PPTP and includes some useful features such as: the ability to save the VPN user/pass, automatic update of VPN nodes list and our latest news, kill switch, DNS leak protection, IPv6 blocking. None of these key features are available with OpenVPN GUI. We suggest to use it even if you already have OpenVPN GUI installed.
1. Download OpenVPN installer for Windows (
http://openvpn.net/index.php/open-source/downloads.html)
2. Install OpenVPN (right click on it > Run as administrator):
- leave all components checked in the Choose Components Window
- allow OpenVPN to install TAP drivers by clicking Install when asked
3. Now you have to download our pre-configured connection profiles from
our repository Save them in C:\Program Files\OpenVPN\config (or the folder where you installed OpenVPN if other. Note: On Windows 64-bit you may find it in Program Files (x86))
4. Start OpenVPN GUI
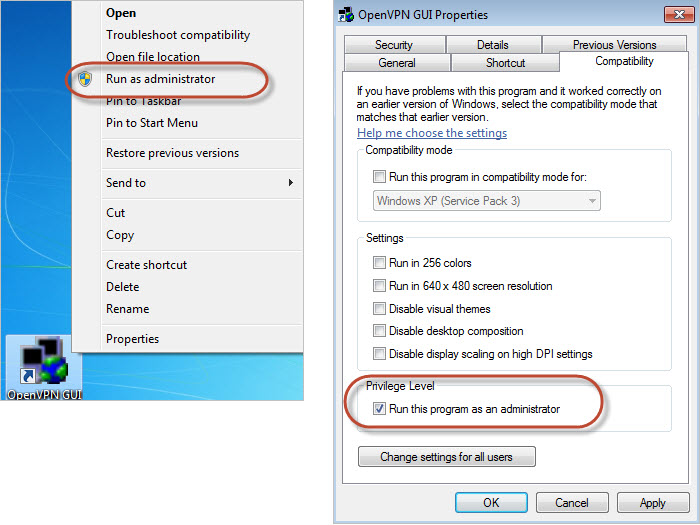
IMPORTANT: on some PCs the VPN connection won't work due to insufficient privileges, so it might be necessary to start OpenVPN GUI as Administrator: right click on OpenVPN GUI > Run as administrator. To always run it as administrator, right click on OpenVPN GUI > Properties > check Run this program as an administrator in the Compatibility tab
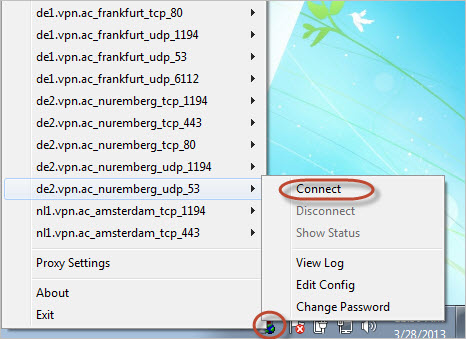
5. Right-click on OpenVPN GUI icon in System Tray to select the VPN Node you want to connect. Click Connect and insert your VPN username/password
6. You will be notified that the connection was established
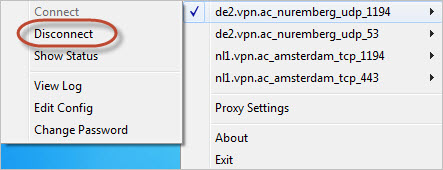
7. To disconnect, right click again on OpenVPN GUI in System Tray and select Disconnect from the node you are currently connected to
TUTORIAL WITH SCREENSHOTS
1. Download OpenVPN installer for Windows (
http://openvpn.net/index.php/open-source/downloads.html)
2. Install OpenVPN GUI:
- leave all components checked in the Choose Components Window
- allow OpenVPN to install TAP drivers by clicking Install when asked
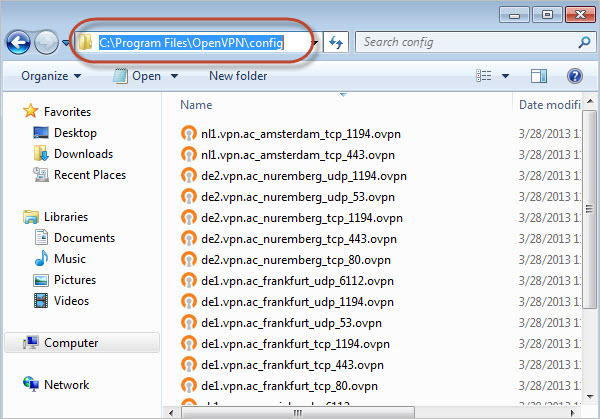
3. Now you have to download our pre-configured connection profiles from
our repository
Save them in C:\Program Files\OpenVPN\config (or the folder where you installed OpenVPN if other. Note: On Windows 64-bit you may find it in Program Files (x86))
4. Start OpenVPN GUI
IMPORTANT: on some PCs the VPN connection won't work due to insufficient privileges, so it might be necessary to start OpenVPN GUI as Administrator: right click on OpenVPN GUI > Run as administrator. To always run it as administrator, right click on OpenVPN GUI > Properties > check Run this program as an administrator in the Compatibility tab
5. Right-click on OpenVPN GUI icon in System Tray to select the VPN Node you want to connect. Click Connect and insert your VPN username/password
6. You will be notified that the connection was established
7. To disconnect, right click again on OpenVPN GUI in System Tray and select Disconnect from the node you are currently connected to